Liquidity Management Guide #
FatSale Liquidity Management combines token swaps, V2 liquidity, V3 positions, protected submission, and atomic bundles in one guided page. You do not need to understand the underlying contracts. Confirm the network, exchange, project token, paired asset, and amount, then follow the on-screen steps.
Start with a small amount. Every on-chain action requires wallet confirmation and a network fee.
Join the FatSale Telegram group for help. Never share your private key, seed phrase, or wallet password.
1. Choose the correct mode #
| Goal | Select |
|---|---|
| Buy or sell a token | Trade |
| Create a new trading pool | Add Liquidity → V2 |
| Add more funds to an existing pool | Add Liquidity |
| Withdraw assets from a V2 pool | Remove Liquidity → V2 |
| Create or manage a ranged position | V3 / My V3 Positions |
| Add liquidity and arrange first buys together | Atomic Bundle when the current network is supported |
| Sell first and remove liquidity afterward | Atomic Bundle, with the sell actions before the removal action |
V2 is the recommended choice for beginners. Tokens with tax, rewards, liquidity return, burns, or other trading rules should also prefer V2. In V3, those rules may not work as intended.
2. Before you start #
- Connect the wallet that owns the assets or liquidity position.
- Switch the wallet to the token’s real network.
- Keep enough native coin for network fees, such as BNB on BNB Chain or ETH on Ethereum, Base, and Arbitrum.
- Prepare the project token address and the paired asset, such as BNB, ETH, USDT, or USDC.
- Verify contract addresses. A token name, symbol, or logo alone is not proof of identity.
3. Page overview #
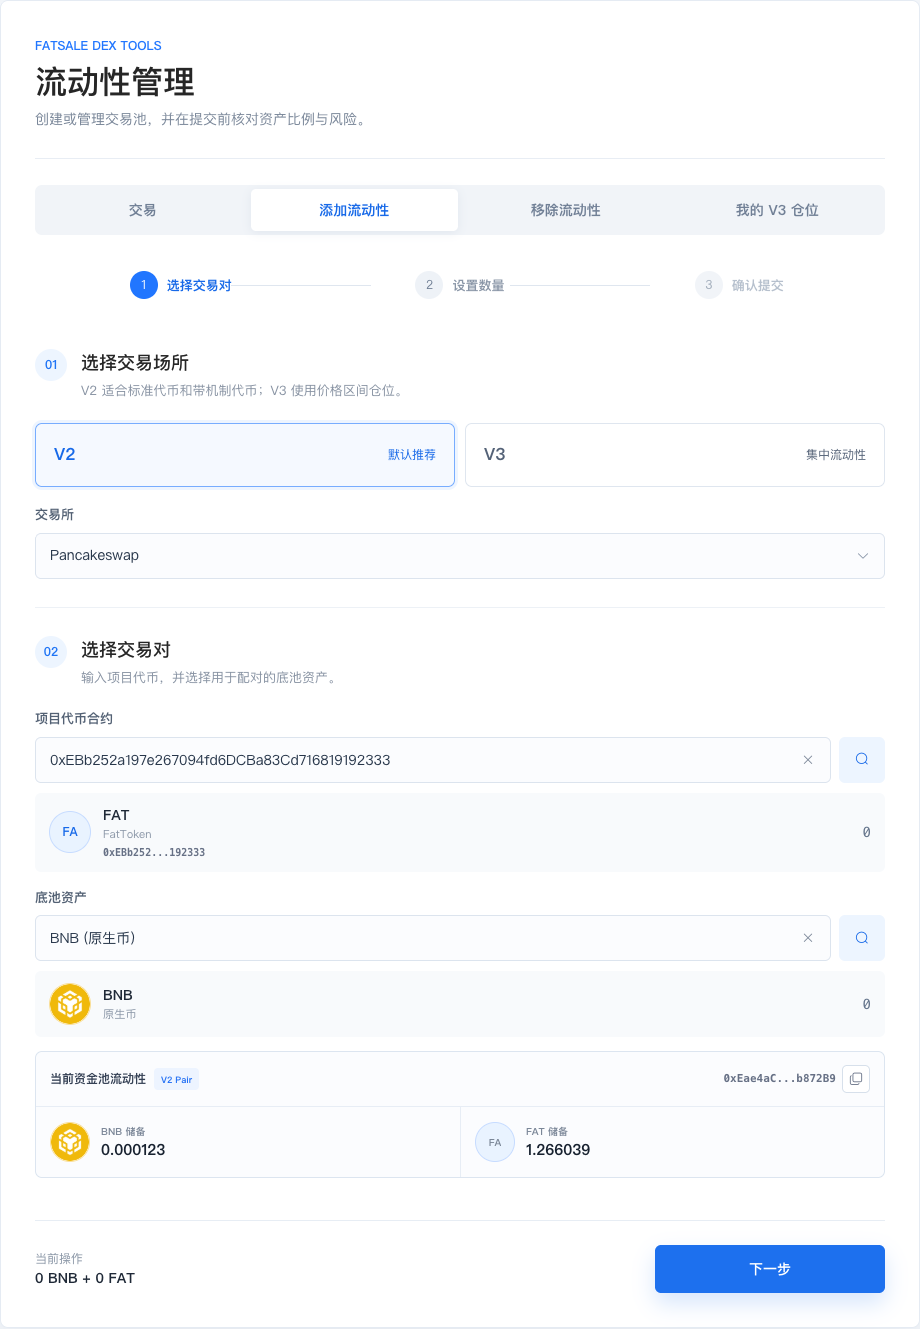
The page contains:
- Mode tabs: Trade, Add Liquidity, Remove Liquidity, and My V3 Positions.
- A three-step progress bar: select pair, set amounts, and review.
- Version and exchange selection.
- Project token and paired asset search.
- Current pool address and reserves.
- A bottom action area showing what will happen next.
While the page is still reading the pair or pool, Next remains disabled. Wait until the loading state finishes so later calculations use the correct pool data.
4. Select the exchange and pair #
V2 or V3 #
Choose V2 when you want a simple full-range pool, automatic ratio matching for an existing pool, or compatibility with tokens that have trading rules.
Choose V3 only when you understand fee tiers, price ranges, position balances, and fee collection. A V3 position may stop earning fees when price moves outside its range.
Project token #
You may select a token created by the connected wallet or paste any valid ERC-20 address. Wait for the page to show its symbol, name, shortened address, and wallet balance.
Paired asset #
Choose a common asset, a token created by the wallet, or paste another ERC-20 address. BNB (Native) and ETH (Native) use the normal coin balance in your wallet.
Current pool panel #
When a pool exists, the page shows its address and both reserves. If one reserve is zero while the other contains a tiny amount, the page may identify an abnormal pool. Follow the built-in repair guidance instead of adding a large amount on top of it.
5. Trade #
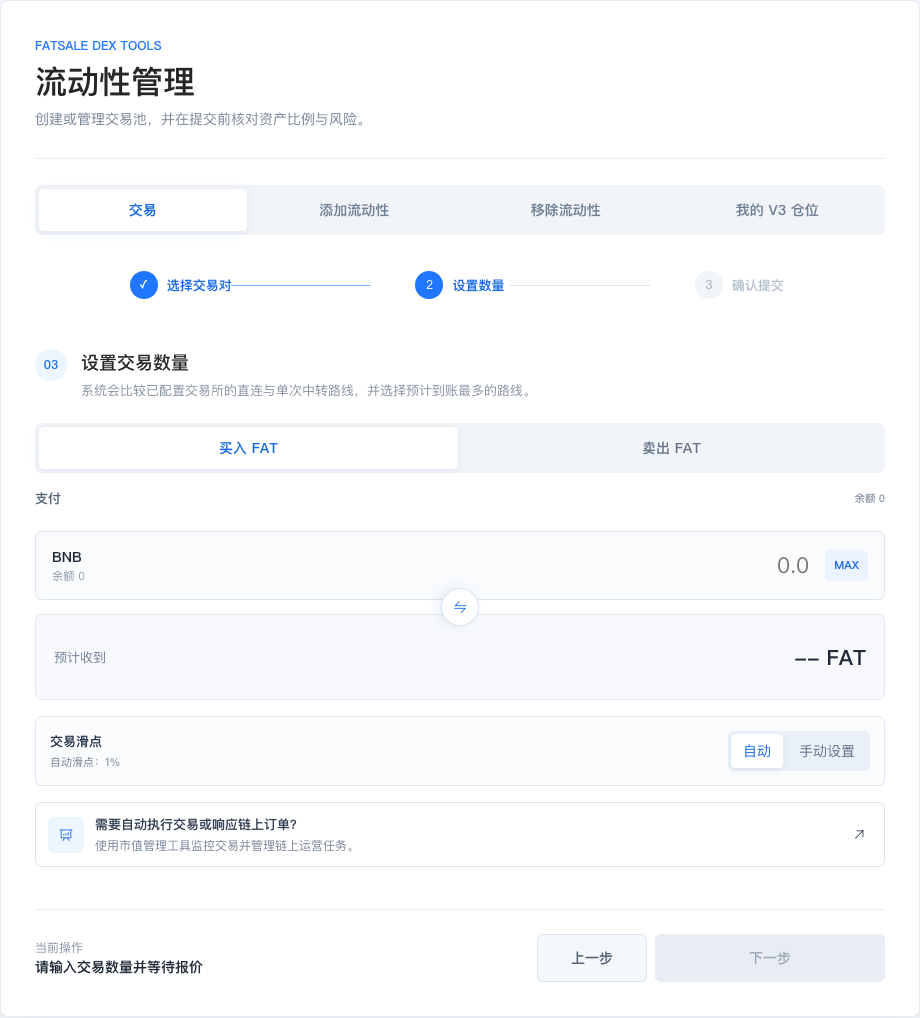
- Open Trade.
- Select the version, exchange, project token, and paired asset.
- Continue after the pool search finishes.
- Choose Buy or Sell.
- Enter the payment amount or use
MAX. - Review estimated output, route, price impact, and slippage.
- Confirm in the wallet.
Buy means paying the paired asset to receive the project token. Sell means paying the project token to receive the paired asset.
Slippage #
Automatic slippage is recommended for most users. The page considers the route and known token rules. You may switch to a custom percentage.
- Too low: the trade may fail when price changes or the token charges a transaction fee.
- Too high: the trade accepts a wider range of unfavorable prices.
No route found #
Check the exchange version, paired asset, pool reserves, and input size. A pool can exist but still be unusable when it has only one-sided or extremely low liquidity.
6. Add V2 liquidity #
First liquidity #
When the pair does not exist, or both reserves are zero, you set the initial ratio yourself.
Example: 1 BNB + 1,000,000 FAT starts with a reference ratio of about 1 BNB = 1,000,000 FAT.
Review every zero before signing. A missing or extra zero can change the initial price by 10× or 100×.
Add to an existing pool #
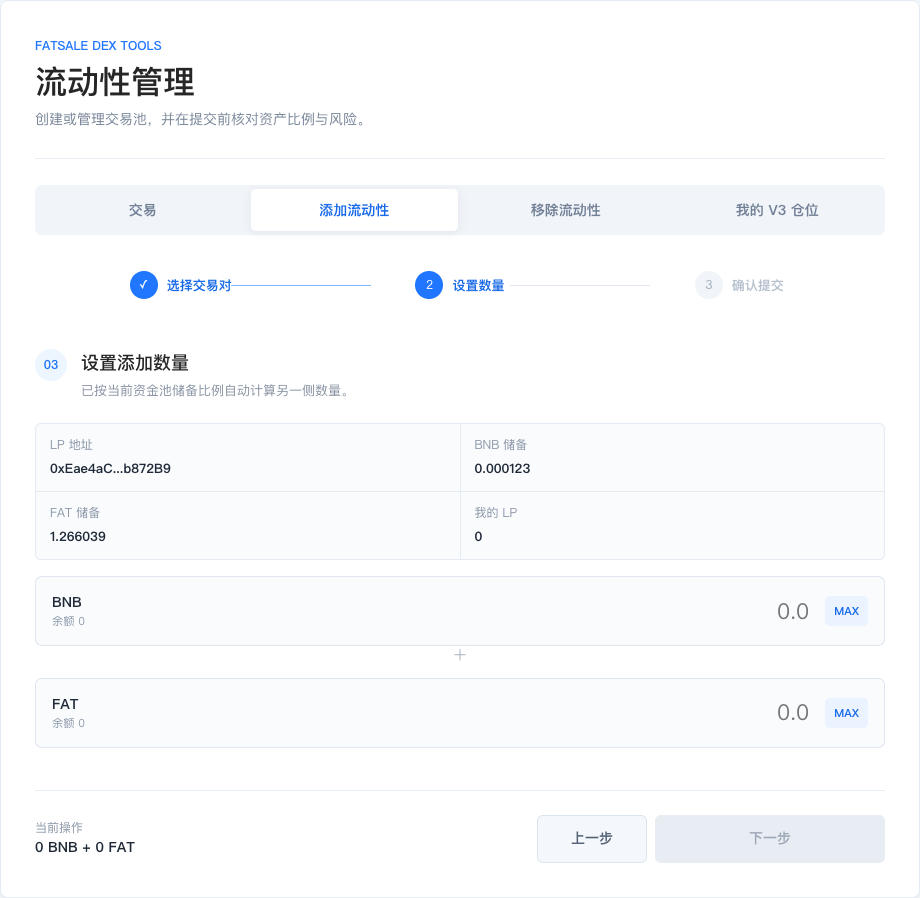
For a healthy existing pool:
- Enter either asset amount.
- The other amount follows the current reserve ratio.
- Review the pool address, reserves, wallet balance, and LP estimate.
- Continue to the review step.
If the BNB amount changes when you edit the token amount, that is normal ratio matching. It does not by itself mean someone transferred BNB into the pool.
Multiple wallet confirmations #
Depending on the selected assets, the flow may include asset preparation, token approval, liquidity submission, and confirmation. The progress dialog shows every required step and skips approvals already completed.
After success, closing the result dialog refreshes the pool and returns to step one while keeping the selected exchange and pair.
7. Remove V2 liquidity #
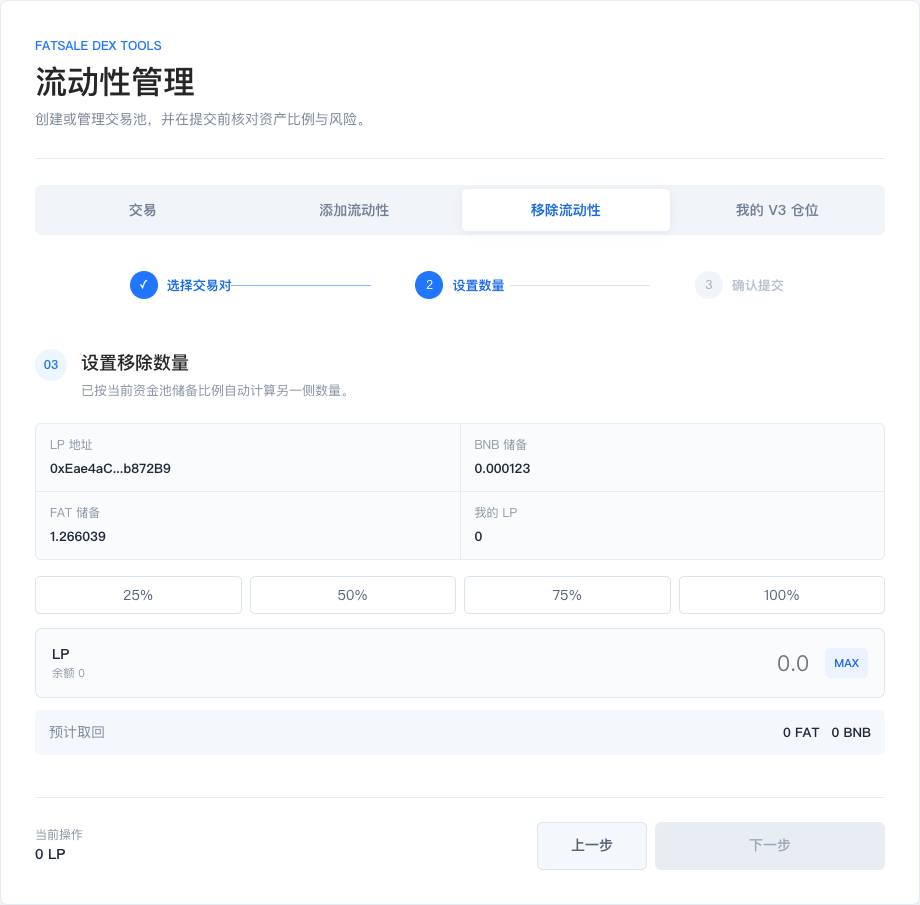
- Open Remove Liquidity and select V2.
- Select the exact exchange and pair.
- Wait for the wallet’s LP balance.
- Choose 25%, 50%, 75%, 100%, or enter a custom LP amount.
- Review the estimated project token and paired asset returned.
- Approve LP when required, then submit.
An LP balance of zero usually means the wrong wallet, network, exchange, or pair was selected, or the LP is staked or locked elsewhere.
Some tokens require a compatible removal path. In that case you may receive WBNB or WETH first and can unwrap it later. If both the standard and compatible checks fail, the page stops before submission so you do not pay for a transaction that is expected to fail.
8. Add V3 liquidity #
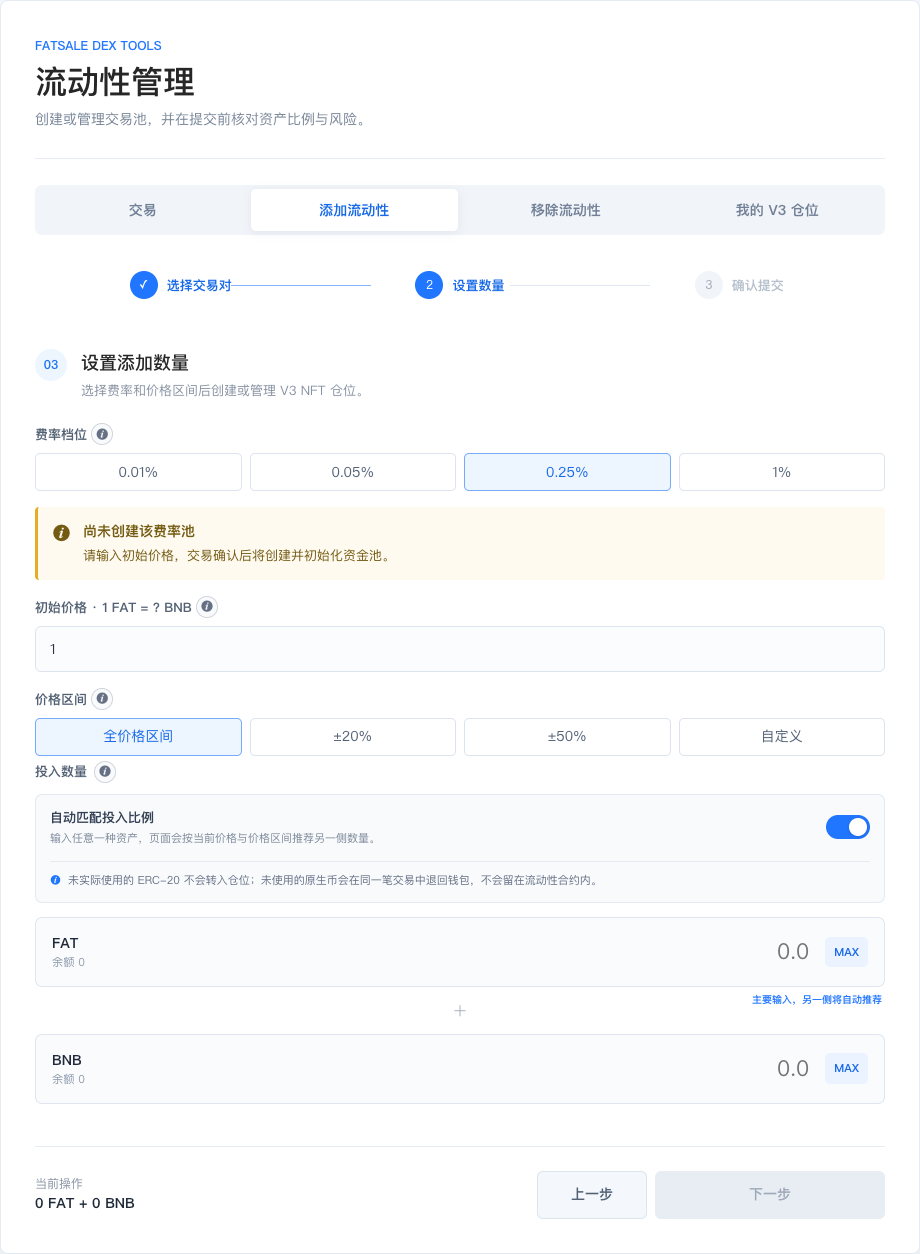
Fee tier #
The fee tier is the percentage paid by traders to liquidity providers. Common options include 0.01%, 0.05%, 0.25%, and 1%. Pick a tier that traders actually use for the pair.
Initial price #
Initial price appears only when that fee-tier pool has not been created. Once created, the pool supplies the current price. The initial price sets the starting exchange relationship; the deposit amounts decide how much capital you contribute.
Price range #
- Full range is simpler but usually less capital-efficient.
- ±20% and ±50% concentrate liquidity near the current price.
- Custom range is for users who understand the intended lower and upper limits.
When price leaves the range, the assets remain in the position, but the position stops actively earning fees until price returns.
Automatic amount matching #
Automatic matching is on by default. Enter one asset and the page recommends the other based on the current price and range. You can disable it and enter both maximum amounts manually.
Unused ERC-20 tokens do not enter the position. Unused native coin is returned to the wallet in the same operation. The unused amount is not stored for later use.
Tokens created by FatSale #
The page may display the FatSale template and known buy/sell tax. A token with tax, rewards, burns, or liquidity rules should normally use V2. If you still choose V3, test adding, buying, selling, and withdrawing with a small amount.
9. My V3 positions #
Each position card explains the position ID, pair, fee tier, current range status, lower and upper price, token balances, and unclaimed fees.
- Increase liquidity adds funds to the same range.
- Collect fees moves accumulated fees to the wallet without removing liquidity.
- Decrease liquidity previews the two assets returned for the selected percentage.
- Close position becomes available only after liquidity reaches zero and remaining fees are collected.
10. MEV protection #
On supported networks and exchanges, protected submission can reduce exposure to front-running and sandwich activity.
- Enable MEV protection.
- Select a protection endpoint shown by the page.
- Use the page button to let the wallet use that network endpoint.
- Confirm the wallet is on the expected network before submitting.
Protection reduces risk but cannot guarantee inclusion or absolute protection.
11. Atomic bundles #
Atomic bundles submit several actions in an exact order. Examples include:
- Add liquidity → Wallet A buy → Wallet B buy.
- Wallet A sell → Wallet B sell → Remove liquidity.
If included, all actions execute in order. If not included, the queue is not broken into separate public transactions.
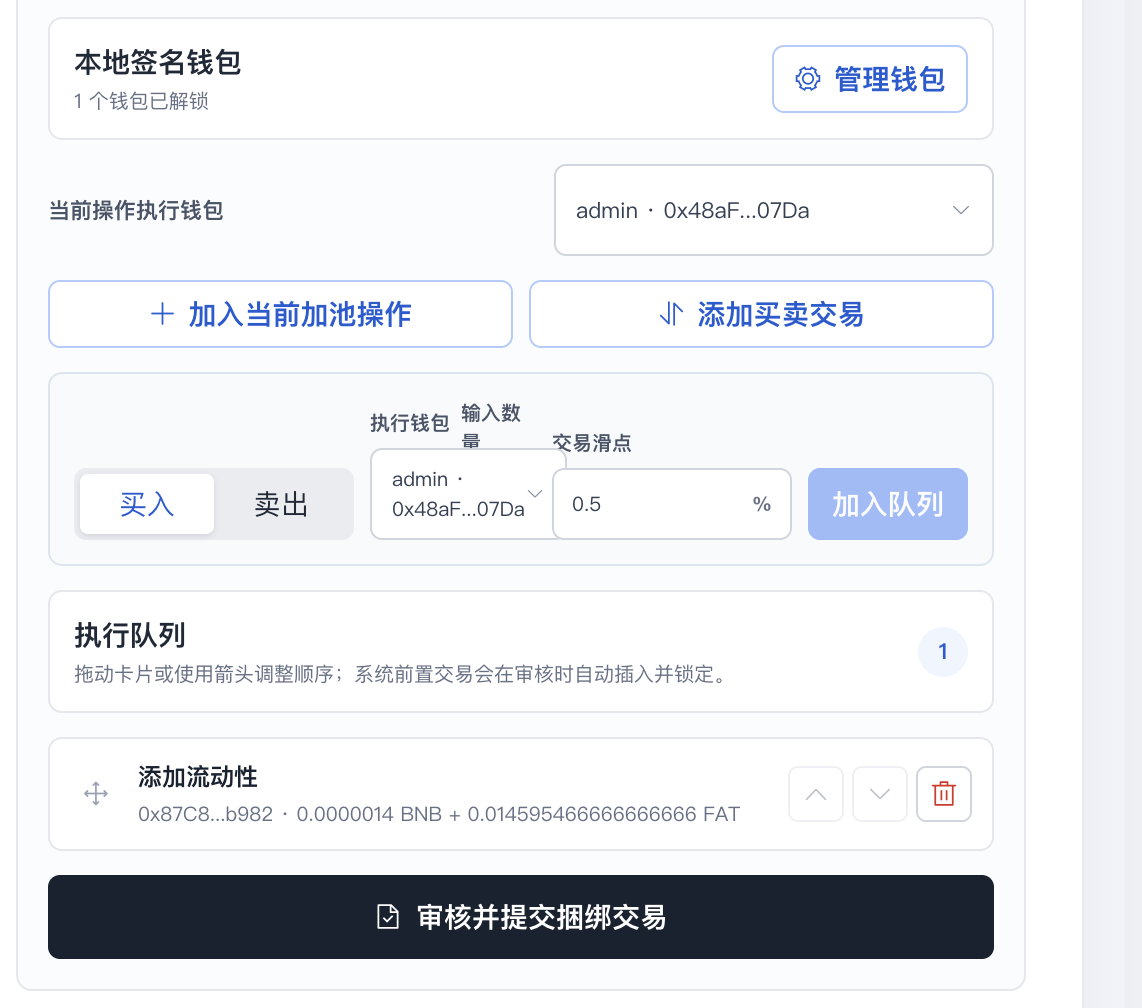
Basic flow #
- Enable Atomic Bundle when the current network is supported.
- Unlock or add low-balance wallets in the local wallet manager.
- Add the current trade or liquidity action to the queue.
- Add additional buys or sells.
- Reorder the actions.
- Review every wallet, amount, route, slippage, fee, and dependency.
- Sign and submit.
The page blocks invalid orders. For a brand-new pool, a buy must come after liquidity is added. If the pool already has healthy reserves, buys can be submitted without a new add-liquidity action.
Retries #
You can choose a retry count. The page shows the current attempt and remaining attempts. A bundle that is not included is not automatically sent to the public transaction queue.
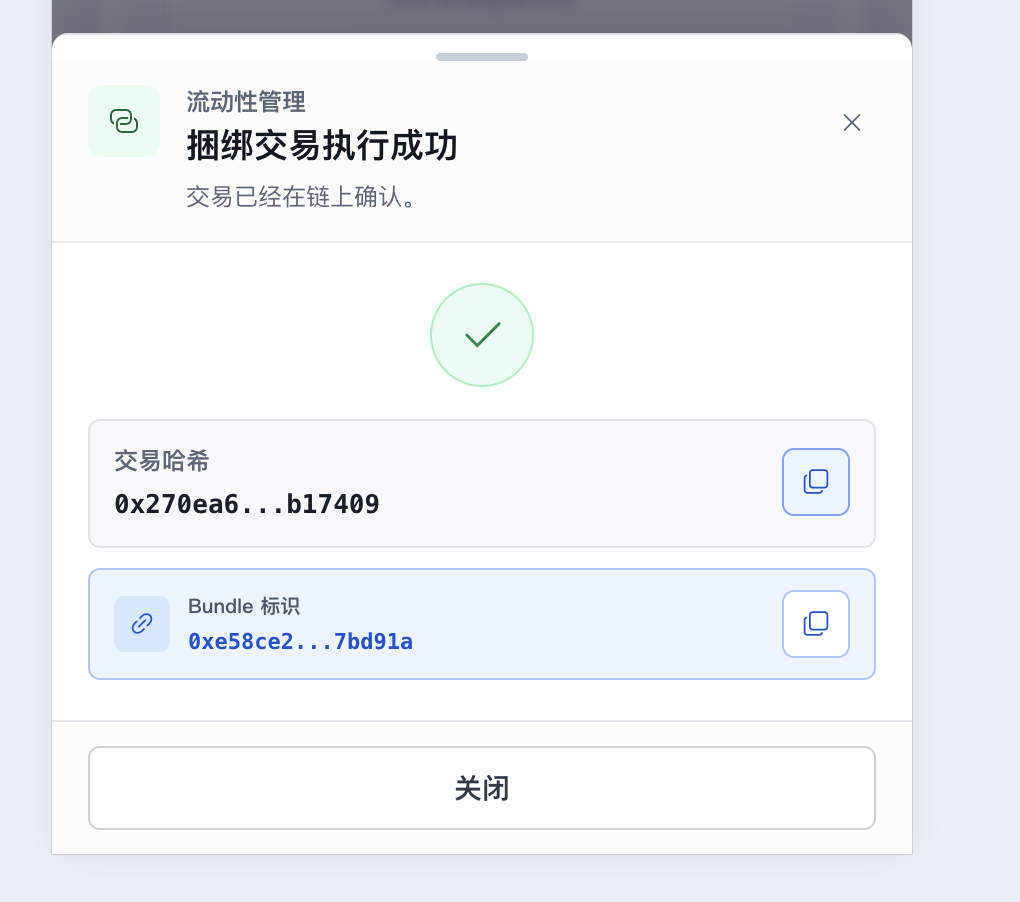
The success result lists every transaction hash with copy and block-explorer actions. The bundle identifier is a submission reference, not a normal transaction hash.
12. Mobile use #
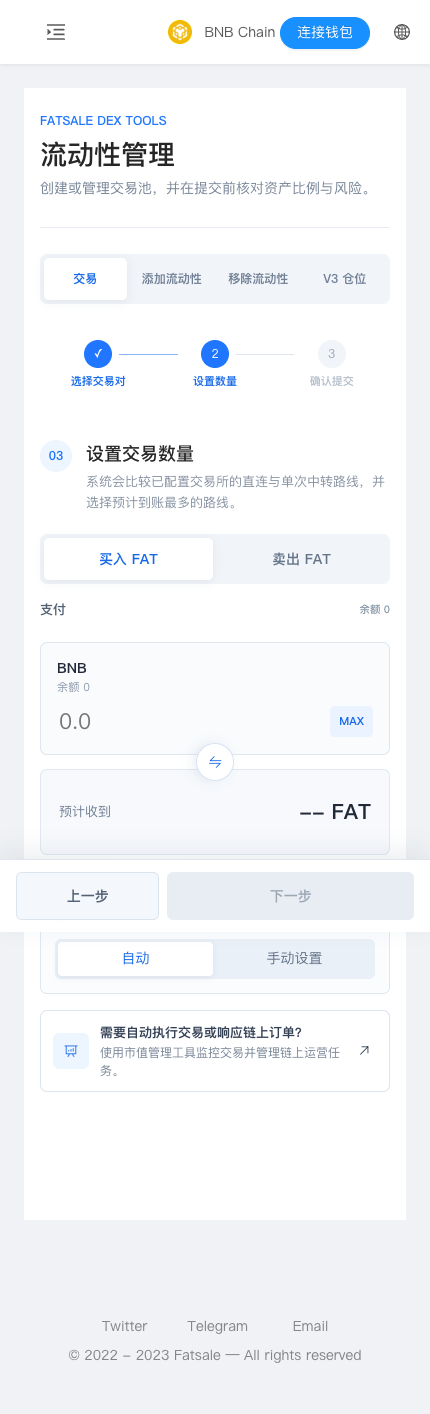
On mobile, action buttons remain at the bottom and dialogs open as bottom sheets. Scroll through the quote before confirming. When the wallet app sends you back to the browser, check the network and current step again.
13. Troubleshooting #
Token information does not appear #
Verify the full address and network, wait for the current read to finish, then clear and re-enter the address. Temporary network limits can also require a short wait.
Next is disabled #
The pair search, token read, pool status, amount validation, or route quote is still incomplete. Read the “Current operation” message above the button.
Pool exists but trade route is unavailable #
The pool may have one-sided or too little liquidity, the wrong exchange version may be selected, or the input may be too small. Return to step one and refresh the pool state.
Transaction not submitted #
If no transaction hash was returned, the wallet network endpoint may be busy or rate-limited. Check the wallet address on the block explorer before retrying. If a hash exists, do not submit the same action again until its result is known.
Removal simulation fails #
Check LP balance, approval, slippage, token restrictions, and pool health. The page tries compatible removal when appropriate and stops before submission when no safe option passes validation.
Abnormal tiny balance in an empty pair #
If one reserve is zero and the other contains a tiny amount, stop and use the built-in repair guidance. If repair is unavailable on that network, contact FatSale support on Telegram.
Atomic bundle is unavailable #
The page shows the currently supported networks. Disable the bundle to continue with a normal transaction, or switch to a supported network.
14. Final safety checklist #
- Wallet and token networks match.
- Token contract address is correct.
- Exchange and V2/V3 version are correct.
- The first-pool ratio has no missing or extra zero.
- Enough native coin remains for network fees.
- Estimated output, slippage, and price impact are acceptable.
- Tokens with trading rules use V2 unless a small V3 test proves compatibility.
- Every bundle wallet, amount, and action order is correct.
- A small test has been completed first.